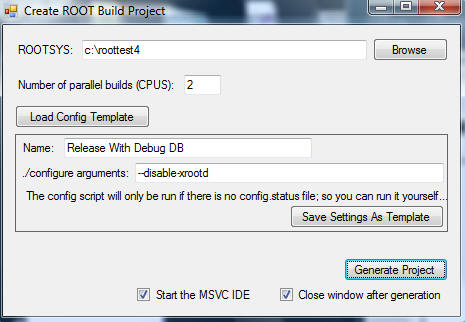
Instructions
This version of the GUI does no checking on the inputs you supply, so please
be a bit careful with what you enter. This is the main GUI:

Follow these instructions to setup a standard build:
- Use SVN to download the ROOT source.
Instructions for SVN and ROOT access can be found on the root site. It
is very long, but you probably only need the first two sections.
- From the Windows start menu, start ROOT Builder.
- Fill in the directory you downloaded the root source to in ROOTSYS. The
directory path cannot have any spaces in it!!!
- See details below if you are running on a directory a second time.
- You can specify how many parallel builds you'd like to run. See the
details section below for more info.
- Click on Load Config Template. Choose one of the templates from the drop
down list and choose one of the following:
- Release -- Build settings to build the standard ROOT build.
This is mostly what is shipped out from the ROOT download page.
- Debug -- Build in full debug mode. Use this if you are
debugging some detail of root.
- Release with Debug DB -- Build with full optimizations, but
also create debug information. This is useful if you want the full speed
of ROOT, but want to be able to see what is going on inside it (call
trace, some variables, etc.). Just becareful because optimizations mean
debug information can lie!
- Alter the config arguments if you wish -- for example, if you want to
build against python. You can save the settings you modify so you can re-use
them later (see details section below).
- Click Generate Project. Depending on your machine, it takes about
5 seconds to generate the project file.
- The IDE should start right up and you can click build, run, etc.
Details
Parallel Builds
Axel gave me the following guidelines:
- 1 - for a single core.
- 2 - for single core plus Hyperthreading.
- 3 - dual core
- 4 - dual core with Hyperthreading
Parallel builds -- especially if you have CPUs -- is a huge improvement in
speed.
Re-running ROOT Builder on the same directory
If you want to re-run ROOT Builder to change the config settings, or rebuilt
a project that has become somehow corrupted, it is easy:
- Enter the ROOTSYS variable. Make sure to do this before you set any
options.
- ROOT Builder will read back in the settings you used the last time.
- Modify the settings as you want (even load a new config template).
- Continue with instructions above.
Configurations
Configuration files are XML files that store the following information:
- List of arguments to pass to the configure command.
- List of arguments to be passed to make.
- List of environment variables that should be defined before a build.
The three configurations listed above come with the install (see the Program
Files\ROOT Builder\Configs directory). If you want, you can create your own. The
simplest is to use the GUI to generate the first version of the file:
- Use the Load Config From Template to select the template that
most closely matches what you want.
- Alter the config arguments, if needed.
- Make sure you change the config Name!!
- Click Save
- You can then edit the XML file to alter make arguments and env variables
(sorry, didn't put that in the GUI in this version). Your config file will
be stored in your roaming profile, under ROOT Builder\configs.

